Saturday, November 06, 2010

Marfy trews

I bought a couple of trouser patterns from the Marfy 2008 catalogue. I was looking for a pattern to make summer weight casual trousers. The pantaloons (from the 2010 catalogue) were a wild experiment along the same theme, but 0680 looked much more likely to be useful. While trouser patterns are perhaps the most difficult to fit, but Marfy skirt patterns do tend to fit me quite well, so I was hopeful. Neve
rtheless, first I made a mockup version, cutting up a pair of cotton baggies and turning them into shorts. Since they were just for practice I didn't bother putting pockets in these, apart from using the one already present on the back of the baggies. I'm sure the experts of trews fitting would spot issues, but just like the Marfy skirts, these fit me really well. So I went ahead and cut into the hydra
ngea print cotton from a local shoppe. I made these straight leg - I'm really not tall enough to carry off seriously flared trousers. This time I included the patch pockets on the front. In fitting I very slightly widened the hips in the pocket area - by less than 0.5cm. These were stitched in August, and were taken to the UK and worn there for a few weeks, until the weather became too cold.


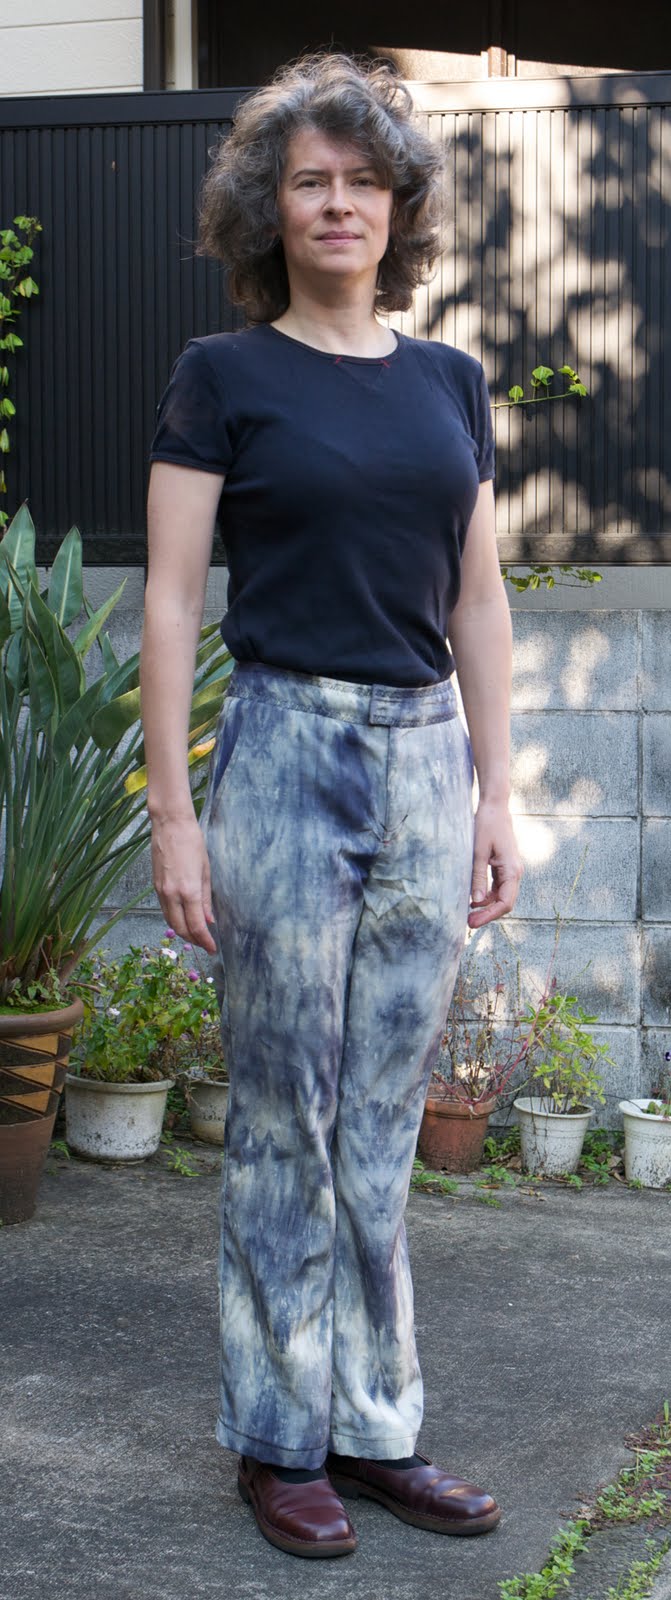
On return to Japan in October, I made the third pair, in an abstract pattern polyester, from the posher of the two fabric shops in Kamakura. This time I made internal pockets and discovered that I had to widen the outside seam by a further cm or so. I think this is not just from having got very fat while in the UK, but also required in order to enable usage of the internal pockets. It is now too cold here to wear these so I hope I still like them come next spring!




At last I've found an interfacing for waistbands that actually seems to work. I find proper waistband interfacing too stiff to be comfortable, and most other interfacing too insubstantial, such that the waistband does not really do its job and tends to wrinkle. .. So a bit of advertising for the new favourite, bought online from the US - Pro-Weft Fusible.

Saturday, July 17, 2010

Pantaloons

This is Marfy 2217 (size 42). Ridiculous trousers like these seem to be fashionable. The odd thing about fashion is that things that look ridiculous when they come out seem normal after a while. So I wondered if my judgment was too harsh and since the model in the drawing doesn't look ridiculous, I thought perhaps these might be a more wearable version of the trend.

They were very fun to make. Look at this marvelous pattern piece! The grain lies along the lines of the floor boards. With just the usual minimalist Italian-English phrases jotted here and there on the pattern, it was very interesting working out how they went together. In the end the sewing itself was not hard in that once the geometry was worked out there were no real technical challenges. There are only 3 pattern pieces, legs, waist band and cuffs at the bottom of the legs.

I chose the
lightest weight cotton I could find, since I thought that stiffness and bulk were definitely to be avoided. Here are the amazing results. Marfy should be sued under the trade descriptions act! :-) Whereas the pantaloons make their fictional model looks tall and elegant, I am made dumpy. One might wonder if a heavier drapey fabric, perhaps a knit, or even having a smaller arse would work better. I think not. A few days before I completed the pantaloons, I had the pleasure of walking behind a pin-stick thin woman in the very fashionable Motomachi area of Yokohama. Her pantaloons were heavy and drapey and swung around back and forth as she walked in the most unflattering way. And yes, her bum looked enormous. If the tiny pert Japanese bum is made to look fat by this trend, there is no hope for the rest of the world.

Nevertheless I have been wearing these almost every day - as indoor only lounge wear! Although I'd prefer they had a higher crotch so that movement was not restricted, the super lightweight cotton is excellent cover for these super hot and sticky days of Japanese summer, and the baggy design allows for good airflow.

Sunday, June 13, 2010

New Pet!

At first we thought it could be fun to get an iPad. Then James discovered that the data plan for the iPad was very cheap compared to an iPhone. From there it was just a short step to wonder if a standalone dataplan could be the best of all. No need to buy an iPad, I can end my iPhone contract but still have mobile internet access through the iPhone wifi (I don't use the phone anyway), James can access the web from his iPod, and we can both connect to the internet from our laptops while away at meetings (public wifi is not that common here).

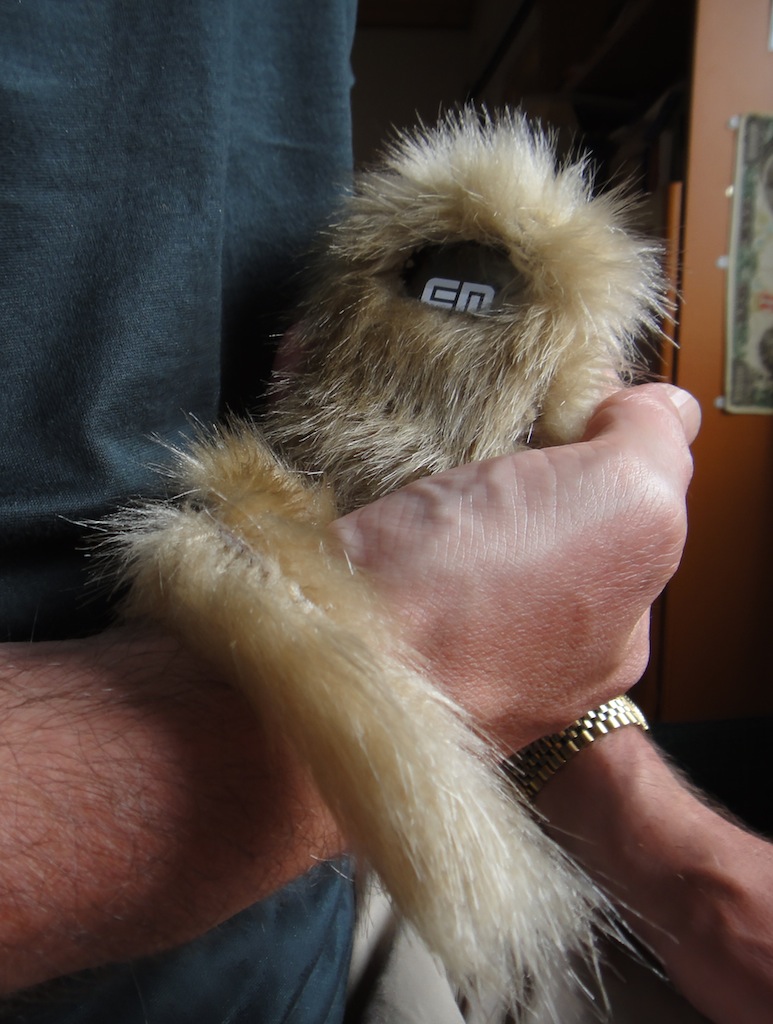
Enter, "Widget", our new EMobile wireless 3G device. We decided not to pay the pittance each month that partially insures the device, so given it's smooth shape and the requirement to handle it on the move, a case was required. Thanks to the fur class I took a little while ago, he's furry, with a tail - and a personality! He is all hand-stitched, and I also had a really fun afternoon creating him.

Saturday, May 29, 2010

Waffle Baffle

I think the hardest part of stitchin' is buying fabric. Not that the spending is itself hard, of course, but getting the right texture, weight, drape, stretch, recovery and colour all together is quite a challenge. Also things that seem OK in the shop do not always turn out as expected. I must try to spend more time in fabric shops!! :-)

This garment is the latest in a saga that I have not blogged before. James has a casual top made from fabric sometimes used in jumpers used for hiking. I'm not actually sure it it is a knit or woven. I'd thought it was a kind of fleece, but now I am not so sure. It is beige, lightweight for a jumper (spring-weight), with only slight stretch, and with a textured pile on the right side. The texture has, for some reason, made us give it the name "waffle baffle"! The colour and style suit James very well and it has had a great deal of wear.

The waffle baffle has been old for some time. It has holes in. So I have been trying to make a replacement. At first I bought 100 weight polartec and went for a different design - a hoodie, but by the time it was sewn up, it turned out to be too hot for spring. By the time I got round to having another go, I was less scared of copying pattern features from RTW garments, so I bought a knit in the right colour that I thought might work in Swany (in Kamakura). It also tuned out too heavy, and being wool, it subsequently felted and shrunk massively in the laundry, even though I had pre-washed it. After that I researched how to treat wool properly, so it was certainly not a wasted experience. The next time I took James with me to Swany to choose a better fabric. We chose a textured knit that seemed the right weight and colour.

The colour and texture look fine but as soon as I got it home and inspected the fabric I knew I was in trouble. It is not really a very heavy-weight knit, but it has a lot of stretch and very poor recovery which makes it hang quite heavily and also, of course, makes it just awful to sew with. Experiments on scraps showed that, without extra support, every seam would have stretched completely out of shape. Inspired by the classes by Sarah Veblen on Pattern Review, that anything is possible as long as you have control of the fabric, I decided to sewing this up anyway, mostly as a learning exercise. I used interfacing in the cuffs, hems and collars, and sewed all the seams with tear-able interfacing between the fabric and the feed-dogs of the sewing machine. This was all quite time-consuming - in fleece this would have sewn up form start to finish in a couple of afternoons, but it has taken me a couple of weeks. But, wonderfully it actually seems to have worked and the seams are not very stretched at all. The disappointing thing, however, is that it seems highly likely that the garment will quickly get out of shape with wear. It is also considerably heavier (in weight although not necessarily in warmth) than the original waffle baffle. The search for a more suitable fabric therefore continues.

To make this I adapted the collar and used KS 2439 View B, which I have used previously to make a zip-front jumper for James (here), to match the waffle baffle. Or so I thought. Actually I made a big mistake, making the slit of front opening at the centre front, rather than the middle of the placket. Luckily the top is so baggy and the fabric so shapeless that it doesn't show too much. Also, as in the original, I made a (interfaced) slit in the side hem, and the back hem is an inch lower than the front with just a 1.5cm turnup at the hem. This worked fine with the original pattern, as it was the right length at the back. I just had to turn it up an extra inch at the front and the cut off the excess. The cuffs are narrower than on the original pattern, and I also had to reduce the arm length and width at the cuff somewhat at the fitting stage.

LIghtweight PJS

Since I started stitchin' I have made two pairs of thick PJs for James. See here and here. He used to have some lightweight pajamas to wear in the brief moments between winter and summer, but these were finally disposed of about a year ago. As they are not worn for much of the year, making a new pair has taken be a while to get round to. I bought the cotton fabric in Yuzawaya (in Kamata) at the end of last year. Hence, the slightly Christmassy snow flakes on the fabric.

I used the same pattern as for the thick PJs and did not change the pattern or construction at all. So these were an easy way to re-start stitching after taking almost a month off my favourite hobby while James' family were visiting us.

As it happens early summer has been a bit cool here, so these PJs have, this year, been worn more than expected.

Monday, March 22, 2010

All fur coat and no knickers

I am taking an online class over at patternreview. This one is about sewing with faux fur. I'm not at all sure about making a fur coat, but you never know... and many nice coats seem to have fur trim, so I thought it would be useful to learn how to handle it fearlessly. Anyway, here is the result of my class project. Most of the other class members are sewing jackets, so I looked through my Marfy catalogues for a suitable pattern, and then drafted in in doll-size, which is very easy as dolls are much more simply shaped than people.

One apparently important aspect of sewing real and fake fur is staying the seams with something called "cold tape". This is special cos it is sticky fabric tape. Since you don't iron fur you can't use any sort of iron-on tape. Amusingly this tape seems to only be available from one shop in whole world, which just happens to be in New York, and you even have to telephone in order to get some surly guy to agree to post you some. So this seems to have slowed most of the class right down. Don't see why they didn't include this in a class kit (some of the other classes do include kits). Anyway, since James' parents visit very soon, I didn't want to wait, and anyway, Yamka (the doll) doesn't demand perfection, so I used fabric medical tape to stay the seams. Problem is that it gums up the needle. Apart from that I basically followed the class instructions... careful cutting out, zigzag seams, bias strips on the cuffs, trimming the fur on some of the seams, clever slit pockets, pick-stitching...etc.... I can't republish all the details here - you'll have to take the class to find out more.

From the dolls clothes point of view, the interesting part is scaling. In the fabric shop (Odakaya in Shinjuku - which has a large fur selection) I didn't know what to buy so plumped for mid-length, mid-thickness, mid-price . But really, for Yamka, I should have chosen a shorter length fur. To cut the bulk down a bit I did not use a facing on the coat, but just lined to the edge. The undercollar is also made from the lining fabric.

Tuesday, March 09, 2010

bum mats

When we came to Japan, we brought with us some Ikea flat pack furniture. It wasn't that we realised that you cannot easily find adult-sized furniture in Japan, but rather that, as we were shipping a crate with our bicycles in, we thought we may as well throw in some versatile solutions for modern living. This included 2 little stools, which we have used as dining chairs ever since. Some years later Ikea came to Japan, and in need of a new sofa, we finally visited recently. We bought a third stool.

And then I had an idea of using up fabric scraps.

I started with what is perhaps an Amish knot rug, using a large eyed leather needle I happened to have. It was made from a piece of fabric I bought with good intentions but then washed with something unfortunate, which turned the white bits of the pattern an unpleasant pale blue. Gosh was it slow and boring work. Took a week or so. Used 1 inch strips folded neatly using a bias-tape maker.


Then, after a visit to Okadaya in Shinjuku, I became the happy owner of a double-ended crochet hook, as well as a more suitable needle. It didn't take long to remember how to crochet - I used to enjoy it and did quite a lot of it when I was 10 years old...so much quicker than knitting. As it turns out, also much much faster than Amish knotting. This one, a spiral, took about a day. Used 1.25cm wide un-ironed strips from an old sheet.


Then I looked on the internets about how to crochet in rounds kind of properly, and made a third bum mat. This time used double 1.25cm thick strips (single 1 inch strips wouldn't work on the hook properly). This one was a little quicker even than the second one, I think.


James helped tremendously by ripping and de-threading the fabric strips. Every few strips I steam ironed and flattened the mat quite hard.

But - I still have loads of fabric scraps left - and to be quite honest, this was very very boring compared to the exciting variety and challenge of clothing construction. Nevertheless the result seems quite nice, and it is good to have a bit of padding on our versatile solutions tor modern living.

Fuzzy James

James' second pair of shop bought fuzzy legs, finally became so worn out that they offered insufficient warmth. So it was time to make him another pair. This time I managed to get a photo of him wearing the finished article.

I had sufficient fabric and elastic stashed, and the pattern and construction technique was identical to last time. The only real difference was that since the first pairs were sewn I have a much improved sewing machine, which made simple work of sewing the super soft and stretchy powerstretch fabric (using the straight stretch stitch). Including cutting out, I made these one Sunday to be worn to cycle to work next day, and almost every day since. It seems we are having a cold late winter here - as I type this it is snowing outside, so it seems like tomorrow will be another day for the fuxxie legs.

The final result was just a touch on the tight side, but they do give in wear. In fact James reports that even now, about a month after they were constructed, they have already relaxed a bit to fit well.


Sunday, January 31, 2010

striped jeans

The shape for these stretch jeans is a mixture of Vogue (7481) and Marfy (1058) patterns. I compared both patterns for many hours and also compared garments made from both patterns. In shape the final pattern is more like the Marfy than the Vogue, but slimmer in the hips. The rear pockets are an enlarged version (to fit iphone better) of those from Vogue 8202 and belt carriers are also from that pattern.

The construction closely follows James' jeans, so that required different adjustments to the pattern, particularly to the fly and pocket areas. To give myself a chance of not messing it up, and also getting close to having a reliable pattern, after cutting out the pattern (with no pockets), in what I was fairly sure erred on the loose side, I tacked it together and then readjusted things (side seams, rear crotch). Then took the tacking apart, adjusted the pattern, and recut the legs out of the same pieces of fabric. For trousers I have got into the habit of cutting the waistband after the legs are fully constructed, to make sure I get the right length and shape. In this case I tried a traditional straight waistband, but got a bit gap at the back, so I cut the final band to the wight length, based on the curved waistband of the Marfy pattern.

What with all that and the lapped side seams, and fly construction, making these jeans was a pretty long job, taking up much of the New Year's holidays plus a couple of weekends in January, but all the guesswork and trial and error seems to have worked out and presently I feel that these jeans are a better fit than either the Marfy or any of the Vogue versions. I find this to be quite encouraging! :-) The photos are taken after about 5 days of wear without laundering. One annoying mistake I made was forgetting how far to overlap the fly front at the top, and not doing it far enough, meaning that it is possible to just see the edge of the zipper puller when the jeans are worn without a belt.

The striped stretch denim is mid to heavy weight and was bought from Swany in Kamakura some time ago. Swany always seem to have some denim, but the selection varies, so when I seem something I like I tend to buy enough for some jeans. My sewing machine sewed through it magnificently as always, only destroying one needle, and skipping just a handful of stitches over the 6+ layer section of the side-seams.

Wednesday, December 23, 2009

T-shirts extravaganza

It may not look like much of an extravaganza, but there are more. I made six in total. Hence the long time time my last blog post.

I decided I needed some simple tops to wear as a base layer during the winter months, which are rather cold here in Eastern Japan due to the buildings being poorly heated.

I used my T-shirt pattern, lengthened it a bit and adjusted the armhole slightly as I went along to try and get better fit. I also drafted the long sleeve by lengthening the 3/4 sleeve pattern I already had. I think I have a reasonable pattern now, assuming I can keep track of all the pieces next time I bring it out.

No photos of me wearing these - it is too cold both inside or outside to wear them with nothing over them, but the longsleeves in particular have been getting continuous wear.

So - the extravaganza:
1. 1 black longsleeve with turtle neck. Nice drape, slightly shiny knit.
2. 1 black shortsleeve (same fabric as 1) with jewel neckline (not shown).
3. 1 green longsleeve with roll-neck, in a less shiny and more cuddly fabric.
4. 1 blue longsleeve (same sort of fabric as 3, and similar tone but blue) with roll-neck (not shown - but being worn to write this post!).
5. 1 red t-shirt. I bought a men's L size T-shirt in Yellowstone, boldly cut it up and re-made it in my size. Really this adventure deserves a blog post in itself, but will have to wait until it is warm enough to photograph. Used original neckline. Made in your standard US thick t-shirt cotton knit.
6. 1 green t-shirt with jewel neckline. Heavier weight than 1; quite a stable fabric.

One thing I learned is that how long to make the neck piece depends on the amount of give in the knit, so I found that rather than apply a rule precisely (like 3/4 neckline length for a turtle neck), it was best to cut it a couple of cm extra and then adjust later.

Wednesday, October 14, 2009

Striped shirt


One day, sitting in church gazing at someone in front of me, I realised he was wearing a nice casual style shirt and then realised that such a shirt could go well with the black jeans I recently made for James and that the fabric (from Emma One sock) I had already bought some years ago to make the long-sleeve version of James' evolving shirt pattern could be just the right thing.

It turned out that the required adjustments had, for once, been made to the pattern before it was put away last time, although since last time was a short sleeved shirt I still had to adjust the arms compared to the original version. I ended up leaving the arm width the same but adding some inches to the arm length, and I took the placket pattern and instructions from David Coffin's shirt making book. I also used the book for instructions on how to construct the shirt. I think that the only major problem remaining with the pattern is that the collar is a bit long in circumference, meaning that were the top button to be fastened there is not really enough room, causing the collar to not look right. Luckily, this shirt is unlikely to be worn with that button fastened, but this would need changing for a more formal shirt. The other issue is that the collar pattern requires a 1.5cm seam allowance on the edge that attaches to the collar stand. I only have 0.5cm, which really made things a bit tricky.

Oh yes - I almost forgot my terrible blunder. I cut out the pattern. Then a day or so later I was again gazing - this time at striped shirt a friend of mine was wearing. ...and noticing with dawning horror that the fabric should match at the centre front not the front edge of body pieces. Of course. Obvious. But I had done it wrong. I also did not have sufficient fabric to cut new front pieces (or even one new body piece). That is until James told me that having a seam across the front is really not a big deal if it is tucked into the trousers. He even suggested that he'd had a shirt like this previously! So I cut new fronts each made from 2 pieces and I lined up the striped pattern on the seam as closely as I could. ...and yes, indeed it worked - so well that I almost forgot to write about it...

Sunday, August 23, 2009

More  Black Jeans

This month's large project was stitching a pair of jeans for James. The first time I made James some jeans
I made the pattern from an old pair of Wrangler jeans. That time, I used moderately lightweight "soft" denim. At the time James said he'd like a pair in thicker "proper" denim. So here they are.

They are creased because I washed them after finishing them, and James has yet to wear them for a day as it is far too hot as yet. They should be good for winter! It is so hot that it was difficult getting James to try these on for even 2 minutes in fading evening light, so if the James looks cross and the photos blurred, that's why. However, his mood did seem to improve a bit as I photographed him so it is possible that the jeans are not uncomfortable. The idea is that these will replace his relatively ill-fitting black Levi 501s, which have a seam-up-the-bum while still being to wide problem (ie too short back crotch seam and too wide hips). Finding really black thick denim was hard work. Eventually I found some in one of the larger fabric shops in the Nippori fabric district in Tokyo (for those who know the area it was the 2F of a shop more or less opposite the famous shop, "Tomato". I think it is called something like "Kawamura". I bought the denim more than a year ago, and I can't see the shop on the latest Nippori map. There was a sample on the wall and I walked round the floor looking for the denim, and then in frustration asked an assistant who escorted me what was almost a separate room, stuffed full of what looked like fantastic denim. Certainly this stuff was great to sew with, thick yet supple, and it even smells properly like real new jeans.) .

I used the same method as last time to make the jeans. A few cm were added to the pattern before putting it away last time, so this time there was enough fabric to make a double hem. In fact I ended up cutting a bit of extra fabric off, and the finished items look quite long too. I decided it was better to leave them long and then adjust them later if required. Perhaps they will decrease in length a bit in wearing and washing.

Constructing these was a lot of fun. I have realised that jeans are all about obvious seams and maximising bulk; on several occasions I was sewing through 8 layers of denim. This is a refreshing change from most sewing which tends to involve things like grading seams to make them as invisible as possible.

Sunday, July 19, 2009

Scrappy Snappy update

Felt tip pen is one of the deadly enemies of vinyl dolls. I can't help that think that Scrappy Snappy would just love to indulge in a little graffiti. So I carefully introduced Mary and Scrappy on neutral territory well away from all stationery. So far so good...

If there were any regular readers of this blog they might recognise the style of Mary's jacket. Yes, I used up some leftover fabric from the Jalie jacket, and made a sasha-sized version. I am not sure such a complex pattern adds much to doll-sized clothing. As sasha aficionados tend to suggest, perhaps "simple lines" suit them best.


Scrappy Snappy

A few months ago a teddy bear maker and doll enthusiast by the name of Ted Menton made a kit for a sasha-sized teddy bear (ie a bear scaled for sashas), and offered to post the construction instructions on line. At the time he started the project, there was plenty of faux fur available in the shops so I elected to use locally available supplies rather than buy the kit from the US. So many people did order the kit, however, that the project got delayed as Ted completed the orders, and by the time the lessons were posted online (Ted kindly emailed me the pattern for free) at "Ted's Teddy Talk", I could find no fur in the Kamakura shops, it being a winter fabric... I guess people in Kamakura mostly wear faux fur rather than make furry animals out of it.

I opened up my numerous bags of fabric scraps and used some faux suede. Very little fabric is needed to make this bear, who Ted named Snappy (because his joints are made with press studs, "snaps" to Americans). The faux suede does have some give so I fused some non-stretch interfacing to the back to make sure that Snappy would maintain a good shape. I stuffed him using the insides of our couch which our little furry friends have made plentifully available. He did look rather naked when finished so I decided to sew him a hairstyle out of some blonde silk yarn I had lying around. This addition does seem to have given him quite a lot of ... character. James says he looks like Johnny Rotten... Consequently I have not yet dared introduce Scrappy Snappy to the comparatively genteel Sashas for fear he will corrupt them.

P.S. That's my marvelous new 15" MacBookPro in the photo!

Sunday, July 12, 2009

red and green - Marfy waistcoat and skirt

I made the waistcoat first. It is Marfy 1468 from catalogue FallWinter2007/08. The outer layer is a faux suede, made of some synthetic fibre. It is easy to work with as it does not fray. The lining is made with silk dupioni in a rather unpleasant pale green with pink cross threads. I underlined (or interfaced) the front pieces of the lining with silk organza. Otherwise I just made the front and the lining and stitched them together as one might a sleeveless dress. I under-stitched the armholes and fronts to keep the lining under control. A few months ago, through PatternReview, I took an online class by Sarah Veblen about buttons and buttonholes. It sounds like a trivial thing to take lessons in, but it was great to learn some correct techniques which come rather close to guaranteeing the desired results. So after having mostly added the lining I decided that not only would this look better with bound button-holes, but that the non-fray feature of the fabric meant this was a really good opportunity to try them out. Since I had already sewn the lining at this point I hand-stitched the buttonholes, which actually was a relaxing way to learn how to make them. I made one practice and then the real things. For fitting I cut 2cm seam allowances, basted together the lining, tried it on, added a bit to the bust and took a bit off the hip, and marked corrected stitching lines on both the lining and outer layer. For the side seams I sewed the outer layer and lining in a single action. I basted this first, tried the waistcoat on and slightly took in the waist before finally stiitching these seams.

The skirt is Marfy 023. It is mentioned but not highlighted in catalogue FallWinter2007/08 which generally means this pattern first appeared in an earlier catalogue, but I do not know when this would have been since I have no earlier catalogues, and I also could not find the pattern on the VoguePatterns site. Anyway, this is a really easy pattern to make so if you are scared by the no instructions of Marfy patterns this would be a good one to start with. I think it should have 4 pattern pieces: 2 waistband pieces, a front and a back. When I came to use my pattern it was missing one waistband piece, but I cannot blame Marfy since we have a small furry pet who just loves to steal bits of paper of this size. So I'm not sure what Marfy had in mind for the waistband but the remaining (back) piece was a simple rectangle so I just drafted a straight 1 piece waist band. I'm not sure I really like waistbands that go firmly round the waist so if I make this again I might just make a narrow binding at the top, and let it sit slightly lower. The skirt has a rear slit and a back zipper. Size 42 fits me almost perfectly (I just took 1cm off the length and slightly straightened the wait to hip profile). I made it out of the same fabric I used to make the green frock. This made things easy since it is a relatively robust fabric but does not need lining, so it is a fairly robust skirt that can still be worn in the hot Japanese summer.