Monday, August 14, 2006

PJs for the little angel

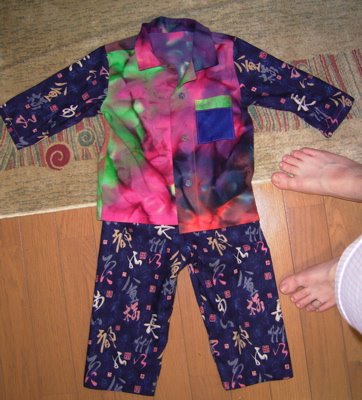
KS3126: "Toddlers' pajamas and tank top. The pajama shirt has long sleeves, a front button closure, a collar and a patch pocket. The pants have side seams and an elastic waist. The tank top has a neckline and armholes finished with narrow hems."

I made the PJ shirt and trousers but not the tank top.

Pattern Sizing: T1-T4. erm. See below.

The pattern instructions were excellent. The top wasn't that quick to make despite being so small, because it is a real pajama shirt. The trousers go together super-fast!

This was a long distance endeavour so, unsure of sizing, I used cotton print remnants.

My brother made a few measurements of the little angel and she came out as the length of a T2 but the width of a T1. However, there is still masses of widthways ease in this pattern. I cut a T1 width with a T2 plus and inch total, since my brother said he'd like them long so that they'd last a while.

The end result - you'll have to trust me since I haven't posted a pic of niecey, looks to me like it is too big all over, but if she keeps her proportions the PJs should fit in autumn or maybe even next spring. (Niecey is in Oz so it is now heading towards spring).

I removed the side seams on the trousers, because real pajamas don't have side seams!

I did french seams everywhere except the armsyce. I suppose I wanted to make a neat looking job since this is an export out of the immediate family!

A good pattern for woven pajamas. Apart from worrying about the sizing it was straightforward and fun making such a little garment. I would like to be able to make a summer weight pair. My brother says these are too thick for summer. Haven't found any suitable fabric yet.

review

Ultra-cool biz

Vogue 1753: loose fitting men's four piece suit (ie jacket, waistcoat, trousers and shorts!). I made the shorts. (38-42) I cut size 40. The pattern instructions were OK, but I still prefer the Kwik Sew zipzops fly instructions which seem much easier yet I am sure they produce a better result.

I used a dark grey-green Tencel from ye olde locale shoppe. This is a very unstiff fabric and has a little bit of give in it even on the straight grain. I found basting the seams prior to sewing helped ensure even feed through the feed dogs. It has a kind of slightly brushed/sueded looking surface. Very nice feel. Machine stitches really sink into it, making them quite hard to remove. The fabric will crease up if you take off the garment, throw it all crumpled up onto the sofa and sit on it all afternoon in a hot and humid environment, as had happened prior to James putting them on again to be photographed(!) - but the creases soon fall out again.

I made no sizing changes to the pattern. Cut a size 40 and basted it together. It looked like it was going to fit so I just went for it. I did turn up the hem about 0.5cm less than advised on the pattern (pattern has huge 1.75 inch hems).

I did not slip stitch the waist band, but instead practiced my ditch stitching. Used the zipper foot for this task, and it worked! I thought another secure line of machine stitching was a good idea in this area, since James isn't kind to his trousers when he rips them off and chucks them across the room. I added a zipper guard - an important feature I think, particularly if you use a metal zipper!

I got James to try on the shorts after turning and basting the hem. Interesting that, once on, in order to get level hems the fronts had to be cut slightly higher and also one leg slightly shorter than the other at the front! The side view photo explains the former adjustment - waistband sits lower at front than back. The latter adjustment still a bit of a mystery - but the moral of the story is - don't finish the hems on shorts until you have tried them on your victim!

Since this is a pattern for a suit I should point out the fastening method (which is the same for the shorts and the long trousers), which, I have concluded, is not really of suit quality. Suit trousers usually have an extended waistband that extends beyond the centre front, with two fastenings. Now I know why. This pattern only has a single fastening (button) just above the fly and no extended waistband. The result is that the wasitband pivots round the button, leading to the fly sagging at the top and also the stress lines in the waistband. Perhaps I could have used some stiffer interfacing for the waistband but that might have detracted from the soft style of the shorts(?). The thing I think would have helped is to use a snap rather than a button since they have a much larger footprint, so the pivoting would not have been as bad. If I make the long trousers I will try and nab a more suit-worthy fastening method from another pattern.

I hope to sew the jacket, maybe the long trouser too. I have enough tencel to do one or the other. The fabric weight is more spring/autumn weight than summer weight, so there is time for husband to wear these for a while and give some feedback. I may also sew the shorts again - I have some very thin ultrasuede (I think) to try.

In Japan they recently invented "Cool Biz" where, for summer, rather than jackets and ties, salarymen can wear short sleeve shirts, no jacket and no tie with their suit trousers. It is all part of the effort to reduce power wastage on air conditioning. Japanese men have, however, yet to show thier knees - husband is leading the way with --- Ultra cool-biz!

review

Js Pertex overtrews

Overtrousers for cycling/ hiking.
These are a modified from an (already modified to fit husband) pattern (by Haan Crafts) for "baggies", which are loose fitting trousers, usually made from bright cotton prints, with elastic waist. Any "baggies" pattern could be used. I'm sure Kwik Sew has an equivalent.

The fabric is Ripstop Pertex from Textile Outfitters. It is a good weight for cycling, but not really waterproof enough for the very heavy rain we get here. For hiking, this Pertex maybe slightly lightweight (get ripped on rocks?), but has a good level of waterproofness for walking conditions. If these get ripped up walking then making them in Goretex should work well. So far they have been worn on several very rainy cycling days and one hiking trip.

I actually made these a while ago, but photographing James in overtrousers is not easy - no one wants to hang around when they are dripping wet - and James wont put them on when it isn't raining (because it is too hot).


James already had a pair of pertex overtrousers but they are very worn out and also had a design flaw. More of that later.

Here are the main technical details working from waist to ankle:

1. Raise the back and lower the front by between half and one inch, to enable good bum coverage while cycling and walking, but avoiding excess fabric at the front while cycling.

2. Checking the baggies pattern to make sure (by comparison with the old pair of overtrousers) that the fit was sufficiently loose to work as overtrousers over hiking trousers. It was OK.

3.Knees. For cycling overtrousers the knees need to be articulated, but avoiding extra seams is desirable to stop water getting in. I made the very simple adjustment of adding an inch at the knee on the front pattern pieces and then made a tuck on each seam.

4. Calf zipper. To enable getting the overtrousers on and off without taking off shoes, a zipper was inserted into the side seams below the knee. The leg width was calculated to fit over James biggest walking boots with the zipper undone.

5. Bottom hem. I cut the trousers long so that they can be brought over the tops of the shoes. Overtrousers that are too short and have elastic round the hem ship water very effectively into shoes! This is the technical fault in the RTW overtrousers husband owns.

For the bottom hem I made a little casing and inserted a loop of thin elastic which can be looped under the sole of cycling shoes. For hiking boots, this elastic remains unused, but then the hem does fit quite snuggly over the tops of the boots, so water cannot ship into the shoes. The legs below the knees are actually a little wide for cycling (zippers not required in the cycling situation), but we discovered this week that the extra width is necessary for the hiking boot situation!

I finished the edges with a multi-step zig-zag stitch since this is the only stitch on my machine, apart from the straight stitch, that does not pucker pertex. I used a liquid seam sealer from textile outfitters to seal the seams. Not sure how well that worked really - probably some sort of tape would provide a more waterproofness.

review