This summer I took 2
PR classes. These were Understanding Sheer Fabrics and Build a Better Tshirt by Sarah Veblen and Shannon Gifford respectively. The thing that started this class taking was that I had accidentally bought a rayon and silk devore when in London earlier this year, and then realised that I had no idea how to sew it. Now I do, although I haven't actually done it yet.
However, the Understanding of sheer fabrics doesn't just apply to silky, dressy things, but also to anything with holes in! I took the tshirt class somewhat as a consequence of taking the sheer fabrics class. After you are going to wear transparent things then you need to have something underneath! The first thing I made as a result of the sheer class was James'
Man Blouse. James looked lovely in that through the summer (the fabric is beautiful) in the intense heat but doesn't wear it outside the house! However, we've seen plenty of Japanese men wearing man-blouses since. The Japanese don't half dress funny!
I chose the Jalie 2005 Tshirt pattern because it had good reviews. In Shannon's class you start with a tshirt pattern and then alter it out of all recognition. You start by making the fit much, much worse but 2 weeks later you have made it quite a bit better than the original pattern, and have a valuable set of basic patterns for future use. Maybe more importantly, by the end, you have learnt a huge amount about how clothes are shaped to fit our bodies and are a step closer to being able to copy design features from clothes on to a basic pattern that is likely to fit. Basic changes for me are shoulders more square and narrowed hips and waist. I also have a bust dart (incorporated into the princess seams in this case) and a non-straight centre-back seam.
People on the Tshirt class suggested that Jalie patterns have more square shoulders and are more inverted V shaped than other patterns. It may be true but I think it must be a pretty small difference. I noticed no particular improvement in this area than Kwik Sew or Vogue patterns, had to square the Jalie shoulders considerably and there were 4 sizes difference
between my bust/chest and waist/hips!
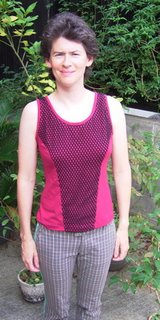
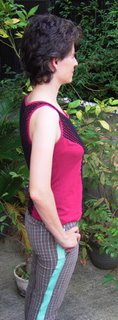
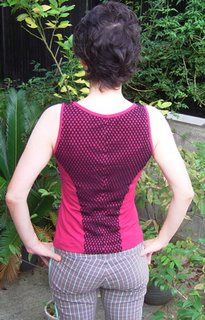
So, I made a princess seam tank which was one of the possible permutations of basic features detailed in Shannon's class.
Shannon seemed to lean more towards modern solutions using hi-tech substances and fancy machines where as my impression from Sarah was one of being "at one" with the fabric and using the correct techniques to slowly convince it to do one's bidding! I pretty much prefer working slower and taking the latter approach. I didn't use interfacing in this top.
For the sheer I used black "fishnet" knit and I underlined this with soft dense red very stretchy 2-way stretch cotton knit for the front and back. Just the red knit for the sides, and for the neck and arm bindings. All purchased in Nippori (a region with 65 fabric stores all within about 10 minutes walk!) in Tokyo. Sarah's (Zen!) sewing techniques were very helpful for getting this stuff to behave. I ended up doing double rows of basting stitches for everything I stitched on the machine. I used a long stitch and tied off all the ends by hand (backstitching was pretty much impossible, with my machine at least).
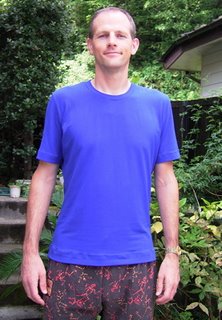

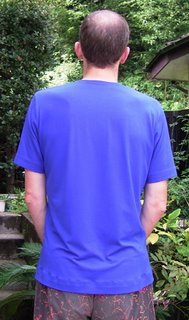
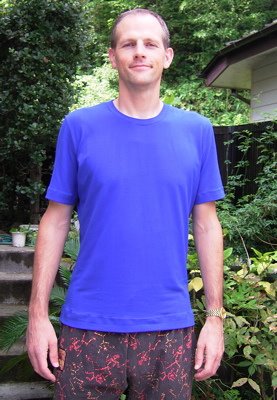
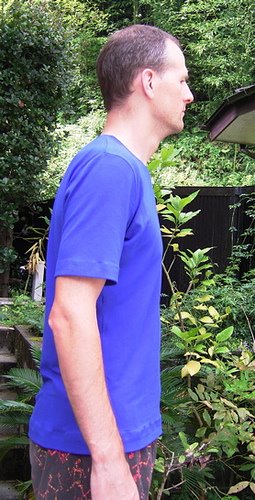
In the Tshirt class I also made a pattern for James from the Jalie pattern. I actually made it before I made the tank for me, so it was actually the first result from the class. Using Shannon's instructions it was straightforward to adjust it to fit James' measurements. I used a blue version of the very stretchy knit. Shannon suggests using interfacing. I used some in this shirt and I think I probably shouldn't have, except for at the neckline. At least the interfacing in the hems is too tough and not stretchy enough for the fabric. It is just about OK, but I will be more careful next time I make a T for James. I think that probably interfacing can be mostly avoided but I also do now have some lighter weight interfacing for knits.
review
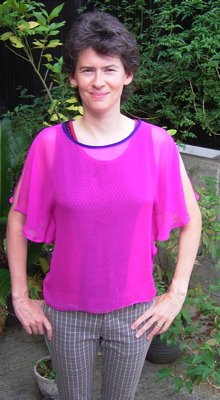


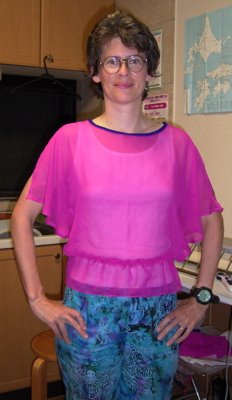 The other change I made after constructing the shirt was to take out the cord and casing at the waist. The casing really didn't look very good through the chiffon, splitting things up with a horizontal line. When the cord was tied it also made the shirt go a bit too weird and girly.