More than 10 years ago James and I bought a pair of Karrimor Slick Rock Bib Tights each. These are cycling bib tights made of Powerstretch, with no extra annoying frills like a cycling chamois or reinforced knees. Powerstretch is very warm and very good at wicking away moisture so excellent for really warm cycling leggings.
  The bib tights go high up the back too which adds considerable extra warmth.
A few years later we bought new pairs. But they were never quite as good . Mostly it seemed the fit was bad - they had gone very long and narrow. So mine were too tight round the ankles (became OK in time) but way too long. I tied knots in the shoulders. Also the fabric did not seem quite as strong, but maybe that was just an illusion.
We have continued to wear both pairs for cycling through the winter months. That means we don't wear them as many months of the year in Japan as we used to in the UK, but we also take them up into the mountains when we go walking in wintertime. Their fantastic warmth is really wonderful in the draughty mountain huts. I always cool down a lot after exercise and can get cold even on quite pleasant days.
Anyway, I'm not even sure that Karrimor make cycling apparel any more. The only reference to these tights I found was on ebay .
 Our fuzzy legs (as we call them) are really very worn out now so we decided last winter that it was time for some new ones. Somehow that means I only have about a month to get both pairs done!
As you can see, I have finished mine. I did them first because they are smaller and therefore easier!
I sacrificed the older pair to make a new pair. I took apart the old pair, but only completely dissassembled one half. Here are the pieces from which I contructed the patterns.
 As you might be able to see the pieces are very stretched - mostly at bum and knees. I did mark on some approximate grainlines with a water soluble coloured pencil. Then I sketched round the pieces and spent some time trying to make sure the seamlines were going to match. Actually they are not all identical lengths but it seems to me from looking at my pieces that there is also no way the originals can have been the same. Basically there is 2cm length extra on the lengths of the side pieces compared to the inner piece (which is the large piece). The two side pieces do match each other well at their join. The easing of the extra length was not even noticible in this 4 way stretch fabric.
 Here's the final pattern. It took a whole day to make! I was amazed how many curves there are. I had thought beforehand that the panels would be straight. I think the final results may be an amalgamation of the Karrimor pattern and the pattern that my body forced the fabric into after 10 years of wear. End result seems to be...a perfect fit!?!
Then on to the contruction. The fabric is the original and best, Powerstretch from Malden Mills.
Most stitches caused the seams to stretch. The small zigzag may have been tolerable since it provided the maximum give in the seam and it was possible to pretty much steam the seams back to their proper shape after stitching, but I decided to use a straight stretch stitch in order to minimise bulk in the seams. I used the stretch thread (Resilon) that is available here (and perhaps no where else?) and a 14 stretch needle (the thread is quite thick at size 50). Previous experience with this straight stretch stitch has taught me that it is almost impossible to unpick but I found that using a contrast thread (I used blue) the impossible became possible.
 For the edges, I was surprised to find that the originals had strips of rubber in the hems. I substituted this with something that seems to be called shirring tape. It is basically less bulky elastic with lots of holes in (I used 1cm width). After refering to the PR resources on stitching in elastic, I overlocked the elastic to the raw edge wrong side, turned it and stitched it down with the stretch straight stitch.
I measured the elastic lengths required from the pattern, and then cut the lengths while holding the elastic slightly firmly, to make sure the elastic was going to provide a snug fit.
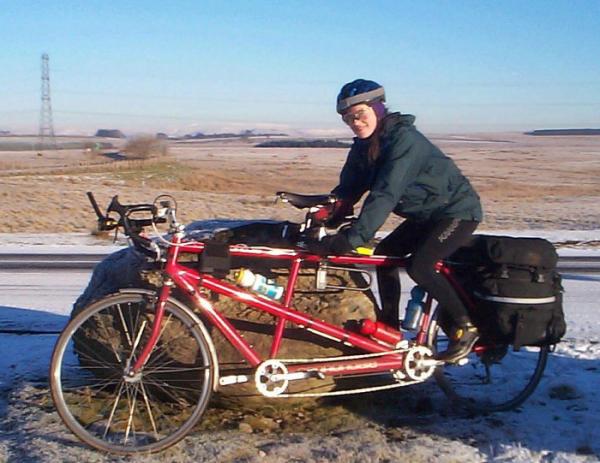
Here is the only picture I could find of the originals in action.