After a fun shopping visit to Harrogate in November (where I found one fabric store, one craft store and a sewing machine store all one one street, as well as a cornucopia of other exciting non-stitching related shops) I looked up to see what was on at the
HIC, and discovered the
Knitting & Stitching Show was just a couple of weeks away!
The show was amazing, and huge and I bought quite a lot of fabric. As should be clear from the name, the show wasn't all about fabric, but there was quite a range - mostly it was not the super expensive fabrics, and quite a few seemed to have special deals for the show. I met James for lunch in town and offloaded some bags on to him and then went back in for more. The only downside was that I seemingly caught a nasty cold off the crowds, and seem to have been not quite 100% ever since, which hasn't been at all good for the training plan! Then again it has been raining almost continuously so not much has been missed in the way of outdoor adventures.
I should have photographed more of the shops to recall their names, but I did take a few snaps.
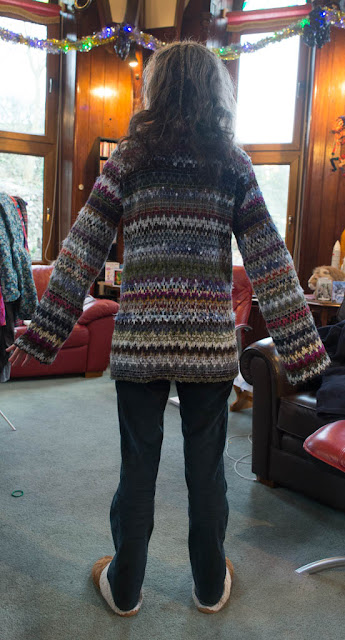
At
Higgs&Higgs (Gloucester, but looks to have an online store) I bought 2m of Missoni knit for 40UKP. That was the most expensive purchase of the day, but was not a mistake as it has already been made up into a lovely sweater. What would have been a mistake would be trusting the sales person who thought that 1.5m would be enough!
The Shuttle is amazingly local (but no website) being in Shipley, and I think it was there that I made 2 purchases. One was a quite lightweight slippery knit in a wonderful pattern. Not sure it is often warm enough here to wear this weight as an outer-layer, so it might have been a somewhat foolish purchase, especially as I still have a lot of lightweight clothes leftover from living in steamy Japan. I think I also bought there 5m of
jigsaw print fleece. This has been sewn up into a dressing gown for James.
I am not sure what I bought at
Simply Fabrics of London, but was moved enough to take a photo, so must have been something...
Let's see if I can remember all the other purchases.
There was a London based store selling quite low quality fabrics for almost nothing. I bought a length of some kind of fuzzy polyester, but totally missed a trick as most of their stuff would have been great for making muslins of one kind or another.
Another store sold end of rolls and didn't know quite what they were selling, but did the salesman was doing his best to inform people before they bought by enthusiastic application of
the burn test. I got into conversation with him, and ended up with what he thought was moleskin, but it was so much cheaper than moleskin I have found online that I have some doubts...
Somewhere towards the end of the day I bought some synthetic red velvet. I am not sure why this was a good idea at the time. I think it might just have been brightly coloured yet cheap. Also towards the end of the day I found some nice, but very dark, brushed cotton for making pajamas with. It was quite expensive and a bit narrow so I was a bit tentative over the quantity and I'm not sure if I got enough for full pajamas for James. Might have to be just a top, or bottom, or for me! I also found some stretch cotton in dark maroon that should work for another pair of trousers for me in my
making-trousers-that-fit odyssey.
 Bought this fleece at the Harrogate stitching show in 2018. James' pair easy enough - just his baggies pattern with a bit less ease in the front and back (so there is not too much super thick fabric all bunched up). But I was guessing for mine. Some problems with the back crotch. It fits well when just standing, but pulls down as soon as I step up a step (as I had to for this pic). The sticky nature of the fleece makes it worse I think. I hollowed out the seam, which helped, and then added pockets when helped some more but there is still not really enough fabric in the back to permit bending over, unless I pull the fabric up my thighs when I sit down. I guess the side seams should be looser.


