
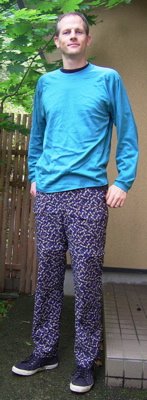

I was amazed to find such a cool pattern, and once I found it, quite a few months ago, making these men's zipzop trews became a bit of a goal. This is Kwik sew 2820 and is a really excellent pattern for the lightweight convertible trousers very popular with mountain climbers and other travellers. I am a girl and I have a pair of RTW convertible trousers in a more female cut. However, I haven't found a pattern for them so if you want to make convertible trousers and are not a man you still might want to get this pattern in order to transfer the details of the convertible parts.
I made these for James since his RTW convertible trousers, while still OK for wearing in the mountains, have suffered a lot of pilling on the thighs and now he says they are not nice enough for normal travel, which is the other thing we use them for.
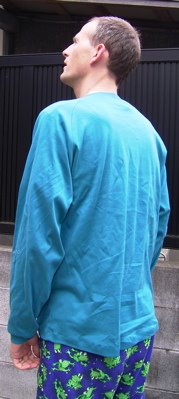
 Here is James being very silly, wearing the zipped-off legs on his arms! Having said that, I did once avoid getting sunburnt by wearing the zipped off legs from his RTW version on my arms. James is now wondering about he possibility of a top with removable arms!
I made the view with the pleated pockets (A I think) and cut small in some places, medium in others, made them extra long and also narrowed the legs considerably.
The only problem I had with construction was that because I went from slightly under medium at the hips to small at the thigh zips, I think I had a bit too much fabric to ease into the thigh hem, and once you have stitched in all the layers of zipper and zipper-guard you can't stretch it to fit. I should have gone down to small 2.5 inches above the bottom of the pattern rather than only 1.25.
 The fabulous zip-zopping technology is explained very well in the pattern instructions. It is not difficult, but is has quite a few steps in it. I employed patience and lots of basting. This isn't a thing to tackle in a rush last thing at night. Several bits have to be put the right way up and the right way round so that the zippers un zip the same way on each leg. The pattern tells you to mark all the pieces which is very good advice. Because of the basting I was able to attach pieces and then check that it was going to work. For example, I don't see how I could have checked that the outside leg seams were going to join up nicely at the zipper if I had only pinned it. There is a step missing, which is top stitching the part of the zippers attached to the long legs part. This missing feature was pointed out by James during one of the try-ons, and was easy to add after the rest of the stitching was done, so not really a problem. NB. This pattern puts the zipper pull on the shorts part of the trousers. James says he would prefer it on the legs part, so that is something to try and swap over for next time.
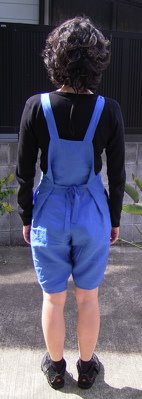
 I was disappointed by the design of the back. I should have read the previous review properly as it goes into some detail about this. Anyway, the RTW design only has elastic at the sides, but this version have elastic all the way round the back, which makes the arse look not as sexy as it might. I did not realise this until quite late on so decided to leave it and maybe improve it is I make another pair. (Picture of James' arse included here especially for WMC to giggle at.)
The other review said the fly was very poor. James agrees it is a little too high, but it did not give me any problems in construction and seems to function OK. Probably something to adjust next time though. James also says I have to buy a higher quality zipper next time!
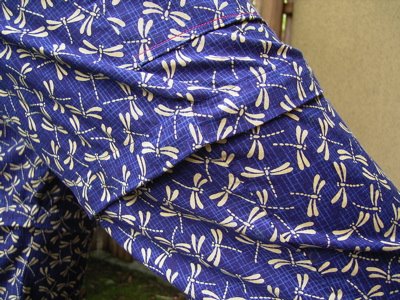
I used a cotton print from local fabric shop. It was on sale - the zippers and other notions together cost rather more than the fabric. I did not, however, buy it because it was on sale, but because we liked it. As it turned out, the small busy pattern is good because it hides the fact that these are convertible trousers. James says the fabric seems quite thin, so perhaps it isn't particularly hard wearing.
I was lucky in having a RTW pair of these which fit James quite well to work from. Changes made: 1 inch off medium size waist-hips, tapering to small size at the thigh zip. Just as well I did that since the small size of zipper (60cm) was the longest I could find. Small size lower legs with extra 3 inches in length, tapering to the bottom width of the RTW version. I didn't use either view A or view B methods of finishing the bottoms (cord gathering/ velcro tab). My version of the legs were narrower so I just did a normal 1.25" hem. If I make a pair for technical use, I may insert a side zipper so the legs can be removed over walking boots.
 You can practise your top-stitching with this pattern. I used some thread I had left over from the trench coat. While making that garment I discovered that it is unwise to edge stitch and top stitch if you can't sew dead-straight, so again with this pattern I went with top-stitching only.
One other possible tip. Both James and I have RTW pairs of convertible trousers. The thing that is a real pain when you are putting on the legs is that it is really hard to tell which leg is which. for that reason I used a blue zipper on one leg and a black one on the other in order to try and remove this irritation. The zippers do not show while the garment is being worn, so hopefully it will be a useful feature.
These are partly a muslin for a pair in more technical mountaineering fabric. However I probably don't need to make them for a while since the RTW version are still functional.
Funny that Kwik Sew don't seem to make the more sporty clothes for women. I'd like versions of all the things I've made for my husband but reducing down to my size is going to be quite hard work I think!
review


