Yesterday I finished the James version of the fuzzy legs. The legs seams are looooong. This time I had an idea what I was doing so it was a bit easier. Once again I took apart one side of the oldest pair of these. Making the pattern did seem a bit easier. I think this was because the pieces were a bit bigger and so kept their shape better. I used the same construction techniques as for the previous pair. I did not stretch the elastic so much when measuring it to avoid artificiaaly shortening the leggings (he tried them on after sewing the seams).
Used hot pink thread (by request) so as to make it easy to distinguish between my pair and James' in the closet.
No pics yet - the weather has been very kind and remained quite warm until the fuzzy legs are finished! Although fit is good, both pairs seem tighter than expected. We think this might be because the new fabric has good stretch recovery and is thicker. The old pairs were transparent in parts.
Sunday, November 12, 2006
Saturday, October 21, 2006
fuzzy legs
 More than 10 years ago James and I bought a pair of Karrimor Slick Rock Bib Tights each. These are cycling bib tights made of Powerstretch, with no extra annoying frills like a cycling chamois or reinforced knees. Powerstretch is very warm and very good at wicking away moisture so excellent for really warm cycling leggings.
  The bib tights go high up the back too which adds considerable extra warmth.
A few years later we bought new pairs. But they were never quite as good . Mostly it seemed the fit was bad - they had gone very long and narrow. So mine were too tight round the ankles (became OK in time) but way too long. I tied knots in the shoulders. Also the fabric did not seem quite as strong, but maybe that was just an illusion.
We have continued to wear both pairs for cycling through the winter months. That means we don't wear them as many months of the year in Japan as we used to in the UK, but we also take them up into the mountains when we go walking in wintertime. Their fantastic warmth is really wonderful in the draughty mountain huts. I always cool down a lot after exercise and can get cold even on quite pleasant days.
Anyway, I'm not even sure that Karrimor make cycling apparel any more. The only reference to these tights I found was on ebay .
 Our fuzzy legs (as we call them) are really very worn out now so we decided last winter that it was time for some new ones. Somehow that means I only have about a month to get both pairs done!
As you can see, I have finished mine. I did them first because they are smaller and therefore easier!
I sacrificed the older pair to make a new pair. I took apart the old pair, but only completely dissassembled one half. Here are the pieces from which I contructed the patterns.
 As you might be able to see the pieces are very stretched - mostly at bum and knees. I did mark on some approximate grainlines with a water soluble coloured pencil. Then I sketched round the pieces and spent some time trying to make sure the seamlines were going to match. Actually they are not all identical lengths but it seems to me from looking at my pieces that there is also no way the originals can have been the same. Basically there is 2cm length extra on the lengths of the side pieces compared to the inner piece (which is the large piece). The two side pieces do match each other well at their join. The easing of the extra length was not even noticible in this 4 way stretch fabric.
 Here's the final pattern. It took a whole day to make! I was amazed how many curves there are. I had thought beforehand that the panels would be straight. I think the final results may be an amalgamation of the Karrimor pattern and the pattern that my body forced the fabric into after 10 years of wear. End result seems to be...a perfect fit!?!
Then on to the contruction. The fabric is the original and best, Powerstretch from Malden Mills.
Most stitches caused the seams to stretch. The small zigzag may have been tolerable since it provided the maximum give in the seam and it was possible to pretty much steam the seams back to their proper shape after stitching, but I decided to use a straight stretch stitch in order to minimise bulk in the seams. I used the stretch thread (Resilon) that is available here (and perhaps no where else?) and a 14 stretch needle (the thread is quite thick at size 50). Previous experience with this straight stretch stitch has taught me that it is almost impossible to unpick but I found that using a contrast thread (I used blue) the impossible became possible.
 For the edges, I was surprised to find that the originals had strips of rubber in the hems. I substituted this with something that seems to be called shirring tape. It is basically less bulky elastic with lots of holes in (I used 1cm width). After refering to the PR resources on stitching in elastic, I overlocked the elastic to the raw edge wrong side, turned it and stitched it down with the stretch straight stitch.
I measured the elastic lengths required from the pattern, and then cut the lengths while holding the elastic slightly firmly, to make sure the elastic was going to provide a snug fit.
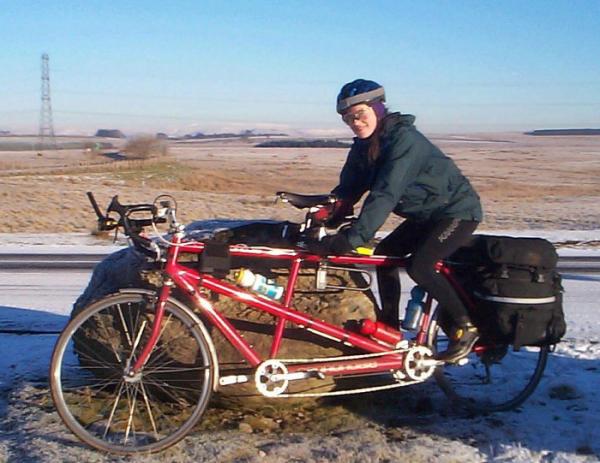
Here is the only picture I could find of the originals in action.
Tuesday, October 10, 2006
mountain hoodie

Burda 8291 is is labelled easy and consists of a knit jumper with a variety of different neck finishes. I made the hooded version. Apart from the hood and neckline, I used modified pattern pieces from the PR "Build a Better Tee Shirt" class that I took earlier this year, rather than the Burda pattern pieces. My version is not quite as long in the body and somewhat closer fitting than the original.

 I was actually attracted by the quite tight looking fit on the pattern photo, although it seems that, on closer inspection, and reading of the other reviews, that the fit is not so close. The thing I most liked about the pattern was that, without too much difficulty, it was possible to meld the hood with the Tshirt pattern I made in the PR class.
The fabric is 100-weight single velour fleece (ie a smooth hard wearing finish on right side and fleece on the wrong side), from Malden Mills prints section. I have had very good wear from RTW jumpers made of this stuff in 200 weight.
I didn't use the pattern instructions except to check how the hood was constructed, which was straightforward. I used the T-shirt class instructions to aid the construction. I used lightweight knit-suitable interfacing on the neckline and I think that was very useful. Interfacing in the sleeve and body hems seems less pleasant to me, although I did do it this time after much testing on scraps of fabric. I also interfaced the hem at the front of the hood which seems OK. I used a narrow zigzag to topstitch down the hood seam allowance and to stitch down the hems since I haven't mastered twin needle stitching (or stitching 2 parallel rows). Haven't looked to see what the Burda pattern suggests for this.
I made quite a few changes to the T-shirt pattern, adding about an inch of ease to the side and arm seams, taking out the CB seam, lengthening the body, slightly modifying the armscye, and taking out the darts. I cut large seam allowances and basted it all together, and then adjusted the fit. The important bit I learned in the class is to bother to transfer the changes on the pattern pieces so that as part of the work, a re-usable pattern is constructed. In addition more small changes can be added in the future so that the pattern can evolve bit by bit.
For the neckline, I made a rough estimate based on the Burda front and back pieces. Then I measured the neckline ofthe resulting pattern pieces and chose a hood size such that the neckline size was correct. I added a cord round the hood front - I am not sure if this is in the Burda pattern or not. For the holes where the cord came out I sewed a bit of interfacing in a rectangle over where the hole was to go right sides together. Then I cut the hole and turned the interfacing to the other side and ironed it down. Wonder if it will fall apart during laundering.
 I intend to sew this again, but will wear this one for a bit first to see how much ease to go for. In fact I already have some fabric which is more fashion fabric than sports fabric so will be interesting to see if it works out. I think that using the tshirt pattern as the base enabled the final result to be much closer to what I had envisaged than had I started with the Burda pattern pieces. As well as being a fun hooded top, it is also an excellet perfomer - took it up the mountains this weekend. It is very good at wicking away moisture, and I appreciated the extra warmth of the hood.
review
Sunday, September 17, 2006
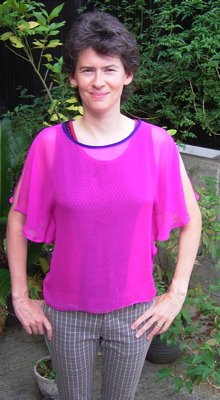
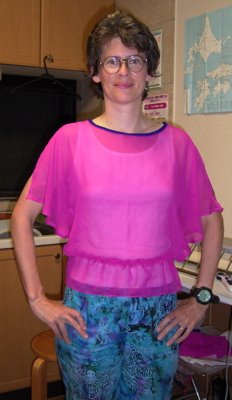
girl-blouse
This is my version of the Man Blouse. It is View A of the same pattern, Vogue 7457.

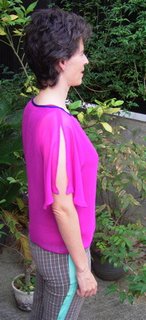

I made this top using the skills learned in the Understanding Sheer Fabrics class that I took on PR this summer. It took quite a while to make, despite the "very easy" tag on the pattern. Since the fabric was chiffon I basted everything and was very very patient!
I cut a size 12 because I hought the 14 was going to be too baggy, and followed the pattern except I made a baby hem on the bottom rather than a narrow hem.
 The other change I made after constructing the shirt was to take out the cord and casing at the waist. The casing really didn't look very good through the chiffon, splitting things up with a horizontal line. When the cord was tied it also made the shirt go a bit too weird and girly.
Making this was partly a silk chiffon practice and partly a test of the pattern for some velvet burnout fabric that I bought in Tokyo. If one made the top a bit longer then it might be possible to tie it round the waist with something.
Tshirts
This summer I took 2 PR classes. These were Understanding Sheer Fabrics and Build a Better Tshirt by Sarah Veblen and Shannon Gifford respectively. The thing that started this class taking was that I had accidentally bought a rayon and silk devore when in London earlier this year, and then realised that I had no idea how to sew it. Now I do, although I haven't actually done it yet.
However, the Understanding of sheer fabrics doesn't just apply to silky, dressy things, but also to anything with holes in! I took the tshirt class somewhat as a consequence of taking the sheer fabrics class. After you are going to wear transparent things then you need to have something underneath! The first thing I made as a result of the sheer class was James' Man Blouse. James looked lovely in that through the summer (the fabric is beautiful) in the intense heat but doesn't wear it outside the house! However, we've seen plenty of Japanese men wearing man-blouses since. The Japanese don't half dress funny!
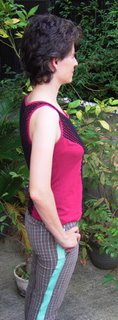
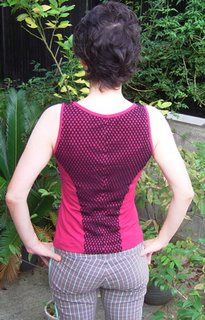 I chose the Jalie 2005 Tshirt pattern because it had good reviews. In Shannon's class you start with a tshirt pattern and then alter it out of all recognition. You start by making the fit much, much worse but 2 weeks later you have made it quite a bit better than the original pattern, and have a valuable set of basic patterns for future use. Maybe more importantly, by the end, you have learnt a huge amount about how clothes are shaped to fit our bodies and are a step closer to being able to copy design features from clothes on to a basic pattern that is likely to fit. Basic changes for me are shoulders more square and narrowed hips and waist. I also have a bust dart (incorporated into the princess seams in this case) and a non-straight centre-back seam.
People on the Tshirt class suggested that Jalie patterns have more square shoulders and are more inverted V shaped than other patterns. It may be true but I think it must be a pretty small difference. I noticed no particular improvement in this area than Kwik Sew or Vogue patterns, had to square the Jalie shoulders considerably and there were 4 sizes difference
between my bust/chest and waist/hips!
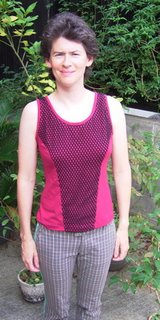
So, I made a princess seam tank which was one of the possible permutations of basic features detailed in Shannon's class.
Shannon seemed to lean more towards modern solutions using hi-tech substances and fancy machines where as my impression from Sarah was one of being "at one" with the fabric and using the correct techniques to slowly convince it to do one's bidding! I pretty much prefer working slower and taking the latter approach. I didn't use interfacing in this top.
For the sheer I used black "fishnet" knit and I underlined this with soft dense red very stretchy 2-way stretch cotton knit for the front and back. Just the red knit for the sides, and for the neck and arm bindings. All purchased in Nippori (a region with 65 fabric stores all within about 10 minutes walk!) in Tokyo. Sarah's (Zen!) sewing techniques were very helpful for getting this stuff to behave. I ended up doing double rows of basting stitches for everything I stitched on the machine. I used a long stitch and tied off all the ends by hand (backstitching was pretty much impossible, with my machine at least).
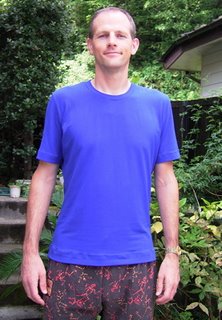

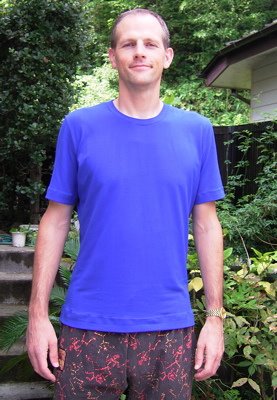
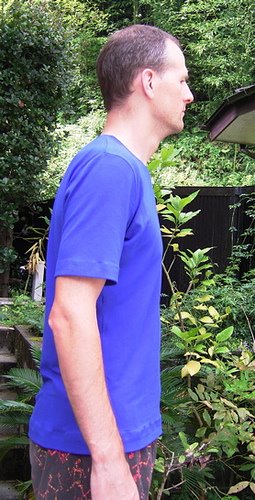
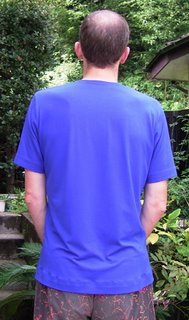 In the Tshirt class I also made a pattern for James from the Jalie pattern. I actually made it before I made the tank for me, so it was actually the first result from the class. Using Shannon's instructions it was straightforward to adjust it to fit James' measurements. I used a blue version of the very stretchy knit. Shannon suggests using interfacing. I used some in this shirt and I think I probably shouldn't have, except for at the neckline. At least the interfacing in the hems is too tough and not stretchy enough for the fabric. It is just about OK, but I will be more careful next time I make a T for James. I think that probably interfacing can be mostly avoided but I also do now have some lighter weight interfacing for knits.
review
However, the Understanding of sheer fabrics doesn't just apply to silky, dressy things, but also to anything with holes in! I took the tshirt class somewhat as a consequence of taking the sheer fabrics class. After you are going to wear transparent things then you need to have something underneath! The first thing I made as a result of the sheer class was James' Man Blouse. James looked lovely in that through the summer (the fabric is beautiful) in the intense heat but doesn't wear it outside the house! However, we've seen plenty of Japanese men wearing man-blouses since. The Japanese don't half dress funny!


 I chose the Jalie 2005 Tshirt pattern because it had good reviews. In Shannon's class you start with a tshirt pattern and then alter it out of all recognition. You start by making the fit much, much worse but 2 weeks later you have made it quite a bit better than the original pattern, and have a valuable set of basic patterns for future use. Maybe more importantly, by the end, you have learnt a huge amount about how clothes are shaped to fit our bodies and are a step closer to being able to copy design features from clothes on to a basic pattern that is likely to fit. Basic changes for me are shoulders more square and narrowed hips and waist. I also have a bust dart (incorporated into the princess seams in this case) and a non-straight centre-back seam.
People on the Tshirt class suggested that Jalie patterns have more square shoulders and are more inverted V shaped than other patterns. It may be true but I think it must be a pretty small difference. I noticed no particular improvement in this area than Kwik Sew or Vogue patterns, had to square the Jalie shoulders considerably and there were 4 sizes difference
between my bust/chest and waist/hips!
So, I made a princess seam tank which was one of the possible permutations of basic features detailed in Shannon's class.
Shannon seemed to lean more towards modern solutions using hi-tech substances and fancy machines where as my impression from Sarah was one of being "at one" with the fabric and using the correct techniques to slowly convince it to do one's bidding! I pretty much prefer working slower and taking the latter approach. I didn't use interfacing in this top.
For the sheer I used black "fishnet" knit and I underlined this with soft dense red very stretchy 2-way stretch cotton knit for the front and back. Just the red knit for the sides, and for the neck and arm bindings. All purchased in Nippori (a region with 65 fabric stores all within about 10 minutes walk!) in Tokyo. Sarah's (Zen!) sewing techniques were very helpful for getting this stuff to behave. I ended up doing double rows of basting stitches for everything I stitched on the machine. I used a long stitch and tied off all the ends by hand (backstitching was pretty much impossible, with my machine at least).
 In the Tshirt class I also made a pattern for James from the Jalie pattern. I actually made it before I made the tank for me, so it was actually the first result from the class. Using Shannon's instructions it was straightforward to adjust it to fit James' measurements. I used a blue version of the very stretchy knit. Shannon suggests using interfacing. I used some in this shirt and I think I probably shouldn't have, except for at the neckline. At least the interfacing in the hems is too tough and not stretchy enough for the fabric. It is just about OK, but I will be more careful next time I make a T for James. I think that probably interfacing can be mostly avoided but I also do now have some lighter weight interfacing for knits.
review
Nano!
 In the previous post you may have noticed James wearing a cute little 2G iPod Nano. This is not his Nano, he is only the model.
So, rather than buy a (currently nonexistent anyway) case for my lovely new Nano, instead, this afternoon I made a case. I used a little bit of some quite thick navy suede that I happened to have.
I just traced the ipod on to tracing paper, added seam allowances at the side and a tab that tucks into the back. It fts quite snuggly so is quite secure I think. I made the first verson out of some left over ultrasuede but it was too supple. The cord is stitched on using a narrow zig-zag. I used a size 16 leather needle and some size 30 pink thread on the top but thinner thread on the back. I topstitched round the bigger holes to add a bit of extra support. The sewing machine went "thunk thunk thunk" as it stitched this stuff but nothing broke and the stitches were generally good.
review
Ultra-cool bizz part #2
 At last I finished the second pair! It is hardly shorts weather now... After seeing James in the first pair of shorts regularly I decided they were really nice and it was worth making another pair right away (to consolidate the things I learned the first time).
The fabric is probably Ultrasuede. It is certainly very much like a swatch I got from Denver Fabrics, so if it isn't US, it is something very like. As I understand it, Ultrasuede is the USA tradename of fake suede made by Toray (a Japanese company), so I'd be unlikely to see the name here. Anyway, they had rolls and rolls of this stuff on the top floor (5th) of Okadaya in Shinjuku, Tokyo, but only 1.5m left of the particularly thin yellowy beigey one that I bought. Most of the rolls said it was OK to wash but this one said dry clean only, so of course I pre-washed it in the machine - no ill effect. Ironing was OK so I could fuse interfacing (also fused a few other bits with seam fusing stuff - darts and the huge seam allowances at the back crotch).
Construction:
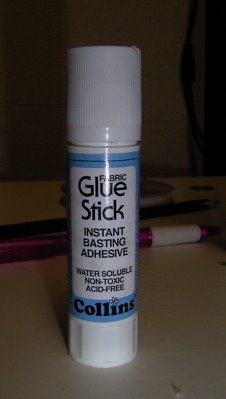
phew! Glue stick is your friend!!!! I glued everything! Hope it washes out like it says on the packet! I used a water soluble pencil to mark things - hope that washes out too :o. I used this page a lot to work out how to do things.
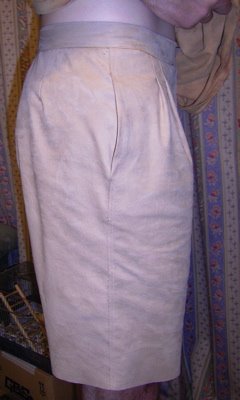 I did lapped side seams, and topstitched the seam allowances above and below the side pockets to the front to match. Maybe you can see some of these details on the side view. The lapped seams are wonderfully supple.
The waistband I did quite differently form the instructions on the pattern. I sewed the crotch first (the pattern sews on the waistband first), then I cut off the seam allowances from the waistband, laid some twill tape on the inside, and basted on the outside and inside of the waistband with glue. Then I double top stitched through all layers. See waistband. With the twill tape stabilising things the waistband seems more snug than the tencel so I haven't actually added the belt carriers.
I used a snap instead of a button and a plastic zipper rather than metal and I think it help the front sag problem (see last paragraph of original review).
 I did not topstitch the inside leg - didn't want to make the seams stiff - they are so nice and soft either lapped or with just a single stitching line. I am not sure if they will hang well with only this one line of stitching - will see once they are washed and worn for a while.
The length is unaltered from the pattern but I cut off the hem allowances and left the edges raw.
review
Monday, August 14, 2006
PJs for the little angel
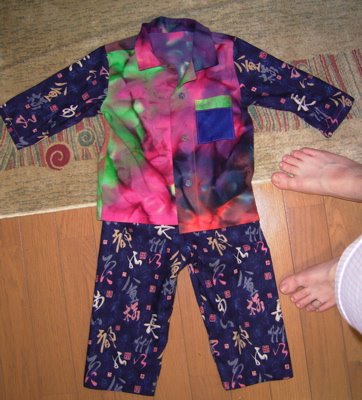 KS3126: "Toddlers' pajamas and tank top. The pajama shirt has long sleeves, a front button closure, a collar and a patch pocket. The pants have side seams and an elastic waist. The tank top has a neckline and armholes finished with narrow hems."
I made the PJ shirt and trousers but not the tank top.
Pattern Sizing: T1-T4. erm. See below.
The pattern instructions were excellent. The top wasn't that quick to make despite being so small, because it is a real pajama shirt. The trousers go together super-fast!
This was a long distance endeavour so, unsure of sizing, I used cotton print remnants.
My brother made a few measurements of the little angel and she came out as the length of a T2 but the width of a T1. However, there is still masses of widthways ease in this pattern. I cut a T1 width with a T2 plus and inch total, since my brother said he'd like them long so that they'd last a while.
The end result - you'll have to trust me since I haven't posted a pic of niecey, looks to me like it is too big all over, but if she keeps her proportions the PJs should fit in autumn or maybe even next spring. (Niecey is in Oz so it is now heading towards spring).
I removed the side seams on the trousers, because real pajamas don't have side seams!
I did french seams everywhere except the armsyce. I suppose I wanted to make a neat looking job since this is an export out of the immediate family!
A good pattern for woven pajamas. Apart from worrying about the sizing it was straightforward and fun making such a little garment. I would like to be able to make a summer weight pair. My brother says these are too thick for summer. Haven't found any suitable fabric yet.
review
Ultra-cool biz
 Vogue 1753: loose fitting men's four piece suit (ie jacket, waistcoat, trousers and shorts!). I made the shorts. (38-42) I cut size 40. The pattern instructions were OK, but I still prefer the Kwik Sew zipzops fly instructions which seem much easier yet I am sure they produce a better result.
I used a dark grey-green Tencel from ye olde locale shoppe. This is a very unstiff fabric and has a little bit of give in it even on the straight grain. I found basting the seams prior to sewing helped ensure even feed through the feed dogs. It has a kind of slightly brushed/sueded looking surface. Very nice feel. Machine stitches really sink into it, making them quite hard to remove. The fabric will crease up if you take off the garment, throw it all crumpled up onto the sofa and sit on it all afternoon in a hot and humid environment, as had happened prior to James putting them on again to be photographed(!) - but the creases soon fall out again.
 I made no sizing changes to the pattern. Cut a size 40 and basted it together. It looked like it was going to fit so I just went for it. I did turn up the hem about 0.5cm less than advised on the pattern (pattern has huge 1.75 inch hems).
I did not slip stitch the waist band, but instead practiced my ditch stitching. Used the zipper foot for this task, and it worked! I thought another secure line of machine stitching was a good idea in this area, since James isn't kind to his trousers when he rips them off and chucks them across the room. I added a zipper guard - an important feature I think, particularly if you use a metal zipper!
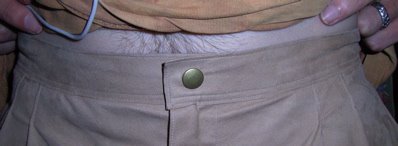
I got James to try on the shorts after turning and basting the hem. Interesting that, once on, in order to get level hems the fronts had to be cut slightly higher and also one leg slightly shorter than the other at the front! The side view photo explains the former adjustment - waistband sits lower at front than back. The latter adjustment still a bit of a mystery - but the moral of the story is - don't finish the hems on shorts until you have tried them on your victim!
 Since this is a pattern for a suit I should point out the fastening method (which is the same for the shorts and the long trousers), which, I have concluded, is not really of suit quality. Suit trousers usually have an extended waistband that extends beyond the centre front, with two fastenings. Now I know why. This pattern only has a single fastening (button) just above the fly and no extended waistband. The result is that the wasitband pivots round the button, leading to the fly sagging at the top and also the stress lines in the waistband. Perhaps I could have used some stiffer interfacing for the waistband but that might have detracted from the soft style of the shorts(?). The thing I think would have helped is to use a snap rather than a button since they have a much larger footprint, so the pivoting would not have been as bad. If I make the long trousers I will try and nab a more suit-worthy fastening method from another pattern.
 I hope to sew the jacket, maybe the long trouser too. I have enough tencel to do one or the other. The fabric weight is more spring/autumn weight than summer weight, so there is time for husband to wear these for a while and give some feedback. I may also sew the shorts again - I have some very thin ultrasuede (I think) to try.
In Japan they recently invented "Cool Biz" where, for summer, rather than jackets and ties, salarymen can wear short sleeve shirts, no jacket and no tie with their suit trousers. It is all part of the effort to reduce power wastage on air conditioning. Japanese men have, however, yet to show thier knees - husband is leading the way with --- Ultra cool-biz!
review
Js Pertex overtrews
 Overtrousers for cycling/ hiking.
These are a modified from an (already modified to fit husband) pattern (by Haan Crafts) for "baggies", which are loose fitting trousers, usually made from bright cotton prints, with elastic waist. Any "baggies" pattern could be used. I'm sure Kwik Sew has an equivalent.
The fabric is Ripstop Pertex from Textile Outfitters. It is a good weight for cycling, but not really waterproof enough for the very heavy rain we get here. For hiking, this Pertex maybe slightly lightweight (get ripped on rocks?), but has a good level of waterproofness for walking conditions. If these get ripped up walking then making them in Goretex should work well. So far they have been worn on several very rainy cycling days and one hiking trip.
I actually made these a while ago, but photographing James in overtrousers is not easy - no one wants to hang around when they are dripping wet - and James wont put them on when it isn't raining (because it is too hot).
James already had a pair of pertex overtrousers but they are very worn out and also had a design flaw. More of that later.
Here are the main technical details working from waist to ankle:
1. Raise the back and lower the front by between half and one inch, to enable good bum coverage while cycling and walking, but avoiding excess fabric at the front while cycling.
2. Checking the baggies pattern to make sure (by comparison with the old pair of overtrousers) that the fit was sufficiently loose to work as overtrousers over hiking trousers. It was OK.
 3.Knees. For cycling overtrousers the knees need to be articulated, but avoiding extra seams is desirable to stop water getting in. I made the very simple adjustment of adding an inch at the knee on the front pattern pieces and then made a tuck on each seam.
4. Calf zipper. To enable getting the overtrousers on and off without taking off shoes, a zipper was inserted into the side seams below the knee. The leg width was calculated to fit over James biggest walking boots with the zipper undone.
5. Bottom hem. I cut the trousers long so that they can be brought over the tops of the shoes. Overtrousers that are too short and have elastic round the hem ship water very effectively into shoes! This is the technical fault in the RTW overtrousers husband owns.
For the bottom hem I made a little casing and inserted a loop of thin elastic which can be looped under the sole of cycling shoes. For hiking boots, this elastic remains unused, but then the hem does fit quite snuggly over the tops of the boots, so water cannot ship into the shoes. The legs below the knees are actually a little wide for cycling (zippers not required in the cycling situation), but we discovered this week that the extra width is necessary for the hiking boot situation!
I finished the edges with a multi-step zig-zag stitch since this is the only stitch on my machine, apart from the straight stitch, that does not pucker pertex. I used a liquid seam sealer from textile outfitters to seal the seams. Not sure how well that worked really - probably some sort of tape would provide a more waterproofness.
review
Wednesday, July 19, 2006
James' summer shirt
 Vogue 7457. Loose-fitting, pullover top has three lengths. A: front/back extend into above-elbow sleeves with slit (wrong side may show) and purchased drawstring. B: cap sleeves. B,C: stitched hem.
The instructions seemed straight forward but I did not follow them exactly. The top is really a test ground for things I learned (am still learning) from participating in Sarah Veblen's recent Understanding Sheer Fabrics Course on PR.
The pattern was very easy with not many seams. For a sheer, unlined top, I think lots of seams have the potential to spoil the flow of the garment.
The fabric is silk chiffon, purchased in Tokyo. Black with white man flowers - and expensive!
I bought this to make View A for me in a size 12-14, but then realised that View C would work for the, erm what shall we call it - home summer shirt - for James. So I bumped up the size to 18, added 4 inches to the length plus an extra one to the back. I also added nearly 2 inches to the arms. View C of this top is straight up and down so no womanly curves to remove from the pattern. [Next time could taper from the under arms by about an inch to the bottom of the shirt - this version is maybe a bit too baggy below the waist.]
I tried various sorts of seams. For bias binding I used some lovely deep red slightly sparkly looking Bemberg lining, which looks lovely either over or under the chiffon.
The neckline I did according to the instructions, but everything else was done differently, using some of the hundreds of sheer fabric techniques explained by Sarah in the class.
 I didn't like the silk pattern of the fabric folded over on itself so I bound the shoulder seams with some bias strips. What I learnt there was that you have to be careful that the fabric is kept at the right tension while feeding it into the sewing machine. Because I didn't take care to stretch the chiffon a bit, these seams did become a bit tight. But I made up for this by stretching the sleeve edges like crazy (I was just playing about) and got rather an interesting effect. I'm calling it a feature.
Anyway, I decided that the fabric show-through was much less obvious for underarm and side seams, so for them I did a simple 4 step zigzag to stop the edges fraying.
 Then we get to the bottom of the garment! The slits look quite nice with a binding. It was my husband who pointed out that I had to use a single piece of farbic to bind the slit to prevent it ripping at the top.
For the bottom hem I was faced with the same potential problem of fabric showing through. What I did was cut a bit of the bias lining fabric, stitch it on like a facing (right sides together) and then it becomes the filling in the fabric sandwich of the hem. I then slip stitched the hem, but I am thinking I might machine stitch across to increase the stability because I am wondering if this hem does rather highlight an error I made in the pattern adjustments. I should have cut the inch longer at the back but tapered the edges to the same length as the front. Instead I cut it an inch longer all the way across. When I first stitched the hem there was a large hill shape in the back hem, which looked three times as bad because the back piece and front piece were a different length at the side. The funny shape required is because of husband's large shoulder blades which pull up on either side of teh centre back. I realised this was my design error and I did improve it a bit when stitching the binding on the slits - I stretched the binding when stitching the back part and stretched the chiffon when stitching the front. As the picture above shows, the edges do now meet. Went for lunch at the local excellent Indian restaurant and the waitress had exactly the same problem at the back of her silky top, so now I don't feel so bad about it!
[Update: I folded the bottom hem in half again and then machine stitched. The extra thickness/stability does seem to have improved how it hangs, although of course the curve on the back hem remains.]
The main conclusion is, if you are a sheer fabric novice like me, choose a really really simple pattern like this one, or you might never finish the thing. This took me about 2.5 days solid fun!
Oh yes one other point. You may be wondering what possessed me to make a silk chiffon man-blouse for my husband. The reason is that he is a Scot living in a country with 35C 100% humidity summers. He refuses to wear anything on his top half while indoors at home. But this top is light enough that he will wear it (so far!) and I much much much prefer these elegant man-flowers to the sweaty alternative! Futhermore, inhabitants of England, currently being scorched by 37C temperatures, may like to take note that it really is OK to take off your woolley jumpers when it gets hot.
review
Thursday, July 06, 2006
jules' jeans
Vogue: 7481 (misses pants)

The pattern says, "Close-fitting, below-waist pants have front button waistband, shaped back yokes and fly zipper closing. A: above-ankle, stitched hems. B: narrow hem. A,B: boot-legged, carriers and pockets. C: floor length."
I think I am not as advanced as many who have sewn this pattern. I picked View C because it was the simplest design so I could concentrate on making it fit. On the other hand, getting a below waist pair of trousers without belt loops to fit and not fall down seems to me to be no mean feat. I took quite a long time trying to get a reasonable fit. I wish Vogue patterns had more sizes on them! After all my trial and error I think I need a 10 front and 12 back but I have a 12-16 pattern.

 I think the back fit is quite a bit better than the front fit!
...but maybe it is the fault of my knees which like to bend the wrong way, thus making trousers look crumpled at the front belowe the knees and tighter at the back. I've seen adjustments for "sway back" mentioned but that seems to be something to do with waists and hips rather than knees...?
I used distressed(?) lightweight stretch denim. It is full of little rips in the crosswise threads that give it the kind of stripey appearance.
I compared and constrasted the pattern with a pair of OKish fitting (but they do need a belt) quite tight slightly stretchy below waist RTW trousers that I own, and decided that a 12 should be OK, although it might require taking in a bit the sides. Possibly I failed to account for the additional stretch in this fabric compared to the RTW, which could have made the trousers come out a bit bigger than anticipated.
After cutting them out, stitching crotch and inside leg seams I basted the sides together and playing about for ages I suddenly realised that what I needed to do was take in the sides of the fronts but not of the backs. I tapered to the normal seam allowance at the hips and then tapered in again below that, but this time the extra half inch or so was taken off both front and back evenly.
The waist band was a weird fit on me. It seemed about the right size at its lower edge but a couple of inches too large at the top edge. I ended up taking in the excess at the back seam and also at the sides by cutting side seams in the waist band.
The fly looked dangerous to me, since it seemed to leave the zipper almost exposed (and probably definitely exposed with my dodgy stitching). Therefore I did the fly from KS 2820, by cutting fly extensions on the front piece. I am not totally sure that after doing the waist band as drafted on the pattern is still the right length, but it seemed to fit OK. Next time I will re-draft the waist band anyway, given the fit problems outlined above.
I took an inch off the pattern length but then took another inch off when sewing the hem.
I had thought the crotch was going to be fine after comparison with my RTW trousers. The front crotch is actually too short on the RTW trousers, leading to the front falling noticibly more below the waist than the back. The pattern was somewhat longer so I thought it would be an improvement. I think it is better but actually it is too long so I probably should have taken about half and inch off the length of the front crotch. I didn't do this partly because I had already sewn the seams around the crotch and also because I think it might be better to start with a size 10 shape of front crotch, which seemed to me to be an alteration that I couldn't make after having cut out a size 12. The other reason I didn't do it was because I already had a better fit than my RTW trousers so decided to stop there.
James thinks the trousers are still a bit loose, but I didn't want to err on the side of too tight and anyway, for summer it feels quite comfortable to have a slightly looser pair of trousers.
I think I will sew it again to try and improve the fit. Perhaps sewing belt loops onto view C would be a good precaution.
These trousers do seem like a very nice pattern, and they do already fit better than RTW, however the impression I have is that making trousers that fit is difficult!
review
Note: Estimated changes for next time, on top of those made for this version, assuming same stretch /weight fabric... take 0.5 inch off each side seam, and 0.5 off front crotch and also off front inside leg. Redraft waistband - make narrower towards waist and also make sure the length is consistent with the altered fly construction! Maybe take extra 0.5 inch off leg length.
Wednesday, June 14, 2006
bloo shaatsu for jules


 Kwik Sew 3027 - misses fitted shirts.
This is an extraordinary thing - a really nicely shaped Kwik Sew pattern. No wear-a-pillowcase styling here.
What's more, now I am wondering if there is something to sleeve cap ease is bogus. This pattern has no sleeve cap ease, but the front and back of the arm pieces are slightly different shapes. The result has plenty of ease - I can whirl my arms in all directions with no tightness across the back or pulling of the front buttons. ...wow!
I wasn't quite convinced about some of the methods in the instructions - then again this is my first wimmin's blouse, so probably it was just me. The bit that scared me was having to topstitch down the collar stand and the cuff-sleeve seam without sewing them down any other way first. The instructions only tell you to fold, pin and sew! For the collar stand part I did the whole yoke thing in a different order so that the only bit of dodgy stitching required was a little bit of hand stitching on the _inside_! For the cuffs I bit the bullet, pressed, basted and then went for it. Actually worked OKish - but I still don't fancy tackling the collar the way they recommended. Perhaps one day I will learn to stitch accurately on skinny hems through multiple layers of curving fabric, but at present, when in doubt I prefer to do some hidden handstitching instead.
I used quite lightweight cotton from yee olde local shoppe in Kamakura. Not sure how they get the colouring. I think it is dyed rather than printed since the fabric has no obvious right side.
I toiled for quite a while working out exactly what fitted might correspond to given my measurements (about 36-37,26-27,35-36), and I ended up with S bust and XS+0.5" hips. The 0.5" on the hips didn't seem worth bothering with so I went with XS on the hips. I tapered between the two, while keeping the S length in both body and arms. I wonder if I could have taken a little bit more off the waist -ie tapered more quickly higher up. It is quite funny - the pattern makers put all these nice feminine curves into their patterns and always end up turning them into much straighter lines! They tell you to buy a french curve but all I need is a ruler. :-o The S arm length and body length seem OK on me, again despite the fact that I am a bit under-tall. Tall people will definitely have to length things on this view of the blouse.
The other thing I did differently was the pattern layout. My fabric patterning seemed entirely random, with some patterned parts and other patches of almost solid blue. Luckily I had enough fabric that I could place all the bits that show on interesting parts of the pattern. So I have quite few useless scraps left over.
I used a thicker thread (size 30) for the topstitching and buttonholes (the latter being a tip I found on patternreview which really worked well - although tricky to set the machine up to handle it - increased top tension and re-testing required after every rethread!).
I am really pleased with the results from this pattern. Given previous experience with Kwik Sew I was concerned they only made shapeless clothes so I put this off for a bit. Then revitalised by the excellent zip zops pattern I made recently I decided to give it a go after all. I am now very pleased that I did and thoroughly recommend this pattern to other newbie blouse makers everywhere.
review
Wednesday, May 24, 2006
ZipZops


I was amazed to find such a cool pattern, and once I found it, quite a few months ago, making these men's zipzop trews became a bit of a goal. This is Kwik sew 2820 and is a really excellent pattern for the lightweight convertible trousers very popular with mountain climbers and other travellers. I am a girl and I have a pair of RTW convertible trousers in a more female cut. However, I haven't found a pattern for them so if you want to make convertible trousers and are not a man you still might want to get this pattern in order to transfer the details of the convertible parts.
I made these for James since his RTW convertible trousers, while still OK for wearing in the mountains, have suffered a lot of pilling on the thighs and now he says they are not nice enough for normal travel, which is the other thing we use them for.
 Here is James being very silly, wearing the zipped-off legs on his arms! Having said that, I did once avoid getting sunburnt by wearing the zipped off legs from his RTW version on my arms. James is now wondering about he possibility of a top with removable arms!
I made the view with the pleated pockets (A I think) and cut small in some places, medium in others, made them extra long and also narrowed the legs considerably.
The only problem I had with construction was that because I went from slightly under medium at the hips to small at the thigh zips, I think I had a bit too much fabric to ease into the thigh hem, and once you have stitched in all the layers of zipper and zipper-guard you can't stretch it to fit. I should have gone down to small 2.5 inches above the bottom of the pattern rather than only 1.25.
 The fabulous zip-zopping technology is explained very well in the pattern instructions. It is not difficult, but is has quite a few steps in it. I employed patience and lots of basting. This isn't a thing to tackle in a rush last thing at night. Several bits have to be put the right way up and the right way round so that the zippers un zip the same way on each leg. The pattern tells you to mark all the pieces which is very good advice. Because of the basting I was able to attach pieces and then check that it was going to work. For example, I don't see how I could have checked that the outside leg seams were going to join up nicely at the zipper if I had only pinned it. There is a step missing, which is top stitching the part of the zippers attached to the long legs part. This missing feature was pointed out by James during one of the try-ons, and was easy to add after the rest of the stitching was done, so not really a problem. NB. This pattern puts the zipper pull on the shorts part of the trousers. James says he would prefer it on the legs part, so that is something to try and swap over for next time.
 I was disappointed by the design of the back. I should have read the previous review properly as it goes into some detail about this. Anyway, the RTW design only has elastic at the sides, but this version have elastic all the way round the back, which makes the arse look not as sexy as it might. I did not realise this until quite late on so decided to leave it and maybe improve it is I make another pair. (Picture of James' arse included here especially for WMC to giggle at.)
The other review said the fly was very poor. James agrees it is a little too high, but it did not give me any problems in construction and seems to function OK. Probably something to adjust next time though. James also says I have to buy a higher quality zipper next time!
I used a cotton print from local fabric shop. It was on sale - the zippers and other notions together cost rather more than the fabric. I did not, however, buy it because it was on sale, but because we liked it. As it turned out, the small busy pattern is good because it hides the fact that these are convertible trousers. James says the fabric seems quite thin, so perhaps it isn't particularly hard wearing.
I was lucky in having a RTW pair of these which fit James quite well to work from. Changes made: 1 inch off medium size waist-hips, tapering to small size at the thigh zip. Just as well I did that since the small size of zipper (60cm) was the longest I could find. Small size lower legs with extra 3 inches in length, tapering to the bottom width of the RTW version. I didn't use either view A or view B methods of finishing the bottoms (cord gathering/ velcro tab). My version of the legs were narrower so I just did a normal 1.25" hem. If I make a pair for technical use, I may insert a side zipper so the legs can be removed over walking boots.
 You can practise your top-stitching with this pattern. I used some thread I had left over from the trench coat. While making that garment I discovered that it is unwise to edge stitch and top stitch if you can't sew dead-straight, so again with this pattern I went with top-stitching only.
One other possible tip. Both James and I have RTW pairs of convertible trousers. The thing that is a real pain when you are putting on the legs is that it is really hard to tell which leg is which. for that reason I used a blue zipper on one leg and a black one on the other in order to try and remove this irritation. The zippers do not show while the garment is being worn, so hopefully it will be a useful feature.
These are partly a muslin for a pair in more technical mountaineering fabric. However I probably don't need to make them for a while since the RTW version are still functional.
Funny that Kwik Sew don't seem to make the more sporty clothes for women. I'd like versions of all the things I've made for my husband but reducing down to my size is going to be quite hard work I think!
review
Friday, May 19, 2006
Bias Top
I made a skirt but then realised there wasn't anything in my wardrobe that went with a four colour iridescent (ie 8 colours really) bias cut silk skirt of interesting shape. I realised quite quickly that making a on-grain top in the same silk wasn't going to work simply by trying this on with it. The colours don't match even though the fabric is the same as the top piece of the skirt! I thought something kind of v-necky - ie wide looking shoulders would work because it should balance the sticky-out bits of the skirt. I looked through quite a few patterns but didn't really find a perfect one. However, I thought would give this bias top a whirl.

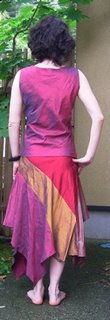 Vogue 9771 - Bias cut top with a strange floppy top, which is called a "cowl". Sounds scary doesn't it? I made the sleeveless top which has only 5 pieces. Should have been a breeze but actually took several evenings trying to get it to fit!
I didn't like the fit (see below under alterations) and I also did not like that the facings were left hanging. I - erm - "catch stitched" them in? I don't know for sure that this is the name of the stitch I used, but it sounds right because you just "catch" a couple of threads of the fabric so that the stitches are invisible from the outside. For the hem at the bottom the pattern said something like "stitch, easing in fullness as required". Made no sense to me so I did the invisible catchy stitchy again because when I tried machine stitching it - it just didn't work.
Going by the sizings, I should be a 14 top and then a 12 at the waist and below. With this pattern I cut a 14 knowing I would have to take in the waist and hips a bit. When it came to fitting I ended leaving the shoulders the same, taking in the bust by 3 7/8", waist by 5" and hips by 6". That was how much it took before the husband's opinion changed from "s'ok spoze. Bit funny.." to "Oh! It's quite nice axtually." !!
The reason for all the strife might be that dupioni silk doesn't sag much when cut on the bias. Having said that. I had no trouble getting the bias cut skirt in the same fabric to fit.
Perhaps some sort of knit top with a v-shaped neck might work better, but this pattern did make economical use of the on-bias rectangles left over from cutting out skirt pieces, and it looks OK, so all in all not a complete waste of time!
review
Subscribe to:
Comments (Atom)